Basement Renovation in Winnipeg, A Complete Before-and-After Planning Guide
Everything you need to know about renovating a Winnipeg basement, from moisture control to layout planning, permits, costs, and the mistakes that waste thousands.
Georgia Home Design
As an Amazon Associate we may earn a commission from qualifying purchases made through links on this page, at no extra cost to you.
In Winnipeg, your basement isn’t a bonus, it’s a necessity. With winter temperatures regularly hitting -30°C and homes spending six months with the furnace running, an unfinished basement is a massive amount of wasted livable space sitting right under your feet.
A well-planned basement renovation adds 500 to 1,000 square feet of functional living area to a typical Winnipeg home. At current building costs, that’s a fraction of what an addition would cost, and the footprint already exists. Unique angle here: Winnipeg moisture, permits, and the order of work before you pick a sofa. Layout and finish ideas that sit on top of this planning work are in basement renovation ideas for Canadian homes. On a one-storey house, the basement conversation is also part of the Winnipeg bungalow renovation guide. If the wet room you care about is the main bath upstairs, not a new basement three-piece, use bathroom renovation in Winnipeg.
This is planning advice from Georgia Home Design, not a lab test and not a priced bid. Dollar figures below are research ranges from Winnipeg quotes we see.
Do not finish a pretty rec room while the kitchen above still fights you. kitchen renovation ideas for Winnipeg is the stay-or-sell sequence for the main floor. If you are listing, buyers open the basement door after they like the living room; Winnipeg home staging covers what they need to see on that first landing. Colour below grade is the warm-light end of best paint colours for small Canadian homes. A side door that drops a half-flight into the basement is a mudroom before it is a lounge.
But basements are also the room where the most money gets wasted on bad planning. I’ve walked into basements where homeowners spent $40,000 and ended up with a space no one wants to use. The difference between a basement people live in and a basement people avoid comes down to planning, moisture management, and design choices that account for the realities of being underground.
The Winnipeg Basement Reality Check
Before you pick paint colours or browse furniture, you need to deal with the unglamorous fundamentals. Skip these and everything you build on top will eventually fail.
Moisture Is the Enemy
Winnipeg sits on heavy clay soil that expands when wet and contracts when dry. This creates constant hydrostatic pressure against your foundation walls. Spring snowmelt and heavy rains are the peak risk periods, but moisture issues can appear any time of year.
Before any renovation, assess your moisture situation:
- Check for visible water stains on foundation walls and floor. White, chalky deposits (efflorescence) indicate moisture migration through the concrete.
- Do the plastic test. Tape a 2-foot square of clear plastic to the basement floor and walls. Leave for 48 hours. If moisture appears under the plastic (between the plastic and the wall or floor), you have moisture coming through the foundation. If moisture appears on top, you have a humidity problem from inside.
- Check your grading and downspouts. The single most effective moisture prevention is exterior, soil should slope away from your foundation at a minimum grade of 2% for the first 6 feet. Downspouts should discharge at least 4 feet from the foundation.
- Inspect the sump pit. Most Winnipeg homes have a sump pump. It should be functioning, with a battery backup. If your sump runs frequently, address drainage before finishing.
If you have active water intrusion, fix it before doing anything else. Interior drainage systems (weeping tile to sump) cost $5,000 to $12,000 in Winnipeg. Exterior waterproofing is more expensive ($10,000 to $25,000+) but more comprehensive. These are research ranges from quotes we see, not a bid. This isn’t money wasted, it’s the foundation (literally) of everything that follows.
Moisture order we will not skip
National “basement ideas” pages start with a sofa. Winnipeg clay does not care about your sofa. Write the work in this order and do not skip a line because the drywaller has a gap in March.
- Outside first. Grade, downspouts, window-well covers, and eavestrough that actually discharge away from the foundation. A pretty interior drain on a house that still dumps melt against the wall is a pump you will hear every April.
- Prove the slab and the walls. Plastic test, stains, efflorescence, and a week of watching the sump after a thaw. A pin-type moisture meter for wood and masonry is a homeowner tool, not a lab. Listing check (basement moisture meter): confirm it is a pin or pinless moisture meter that can read masonry or wood, not a kitchen food probe sold on the same “moisture meter” page.
- Water management. Weeping tile to sump, a working pump, and a battery backup if the power dies in a spring storm. An indoor/outdoor sump backup battery is cheaper than a finished rec room sitting in meltwater. Listing check (sump backup): confirm the kit matches your existing pump type (pedestal vs submersible) and that you are buying a backup system, not a second primary pump with no battery.
- Insulation only on a dry assembly. Rigid foam against concrete, then a stud wall. Fibreglass against a damp foundation is still a mould kit.
- Then layout, paint, and furniture. Colour and gallon counts wait until the inspector has seen the insulation. Use the Paint Calculator after that, not before.
If you can smell the basement after a thaw, stop. You are not in step 5.
An indoor hygrometer on an interior basement wall, away from the laundry steam, tells you whether you have a humidity problem or a leak. Listing check (basement hygrometer): confirm it reports relative humidity and temperature as an indoor unit, not a weather-station kit with outdoor sensors you will never mount.
Insulation: Doing It Right Matters More Here Than Anywhere
Winnipeg’s climate means your basement walls need proper insulation and vapour management. The Manitoba Building Code requires minimum R-20 for below-grade walls.
Recommended approach for Winnipeg basements:
- Rigid foam insulation (2” XPS or EPS) directly against the foundation wall. This provides a thermal break and vapour barrier in one layer. Do not use fibreglass batts directly against the foundation, they absorb moisture and create the perfect environment for mould.
- Frame a 2x4 stud wall with a 1-inch gap from the foam (or directly against it, depending on your inspector’s preference). Fill the stud cavities with fibreglass or mineral wool for additional R-value.
- Vapour barrier on the warm side (facing the interior). Poly sheeting over the stud wall before drywall.
What not to do: Do not insulate a basement that has active moisture problems. You’ll trap the moisture inside the wall assembly, creating mould behind your brand-new walls that you won’t discover until the smell becomes unbearable or someone gets sick.
Ceiling Height: The Deal-Breaker
Manitoba Building Code requires a minimum ceiling height of 6 feet 5 inches in at least 75% of the finished basement area for it to count as livable space. Most older Winnipeg basements have 7-foot ceilings, which leaves very little room after accounting for the floor buildup (1 to 2 inches) and ceiling finish (drywall on furring strips takes about 1.5 inches, a dropped ceiling takes 4+ inches).
Maximising ceiling height:
- Drywall directly on joists wherever possible. This saves 1.5 to 4 inches versus a dropped ceiling. The trade-off: accessing plumbing and electrical above is harder after finishing.
- Use LVP or engineered flooring with thin underlayment (3 to 5mm total) instead of thick carpet and underpad.
- Run services strategically. Routing ductwork, plumbing, and electrical before finishing lets you minimise bulkheads and soffits.
- Basement underpinning (lowering the floor) is an option but it’s expensive ($30,000 to $60,000+) and disruptive. Only consider this for extremely low ceilings or if you’re adding a legal suite.
Planning the Layout
The best basement layouts work with your existing infrastructure, not against it. Before you draw a single wall, map out every obstruction:
- Support posts and beams, these can’t move without structural engineering
- Furnace and water heater, need clearance and access for maintenance
- Electrical panel, requires 36 inches of clear space in front (code requirement)
- Floor drain and sump pit, need to remain accessible
- Ductwork runs, determine where soffits will be needed
- Plumbing stacks, dictate where a bathroom can go (adding one far from the stack adds cost)
Most Requested Basement Layouts in Winnipeg
Family room + bathroom + storage The most common configuration. A large open living area, a 3-piece bathroom, and a dedicated storage room. This hits the sweet spot of usability, cost, and resale value.
Suite/rental conversion Increasingly popular in Winnipeg as housing costs rise. A legal secondary suite requires separate entrance, bedroom with egress window, kitchen, bathroom, and fire separation from the main dwelling. The City treats a secondary suite as a development-permit conversation, not a rec-room refresh. Permits are required and inspections are thorough. Budget $50,000 to $80,000+ for a code-compliant suite: a research range, not a bid. The rental income ($800 to $1,200/month in most Winnipeg neighbourhoods) is a planning band we hear, not a guarantee for your street. If you want the rent, budget the fire separation and the second exit. If you want a family room, do not call it a suite on the listing.
Home office + gym + rec room The post-pandemic layout. A dedicated workspace, a workout area, and a relaxation zone. This layout works particularly well in Winnipeg basements because the consistent cool temperature is actually pleasant for exercise.
Kids’ zone + guest room A play area that converts to a guest room as kids grow. Built-in storage, a Murphy bed or sofa bed, and a bathroom make this flexible and practical.
Design Principles for Underground Spaces
Basements present unique design challenges that above-grade rooms don’t have. Ignore these and your finished basement will feel exactly like a basement, underground, dark, and unwelcoming.
Light is everything. Natural light is limited, so you need to compensate:
- Recessed LED pot lights throughout (every 4 to 5 feet for even coverage)
- Warm colour temperature (2700K to 3000K), cool white LEDs make basements feel clinical
- Table lamps and floor lamps to create pools of warm, ambient light
- Light paint colours on walls and ceiling to maximise reflected light
- Maximise window wells, if you have basement windows, keep them clear and consider enlarging them for both light and emergency egress
Colour palette: Light and warm wins. Avoid dark feature walls in windowless basements, they absorb the already-limited light. Good choices:
- Warm white or cream for walls and ceiling
- Warm greige for a slightly richer feel
- Soft sage or pale blue for a subtle colour without heaviness
- Save darker tones for furniture and accessories, not walls
Names and undertones for those lights are on the small-home paint list. Test them under the lamps you will actually install, not under a basement bulb you are about to throw away. Gallon counts: Paint Calculator.
Flooring that handles moisture: Even with excellent waterproofing, basement floors should be moisture-tolerant:
- Luxury vinyl plank (LVP): The top choice for Winnipeg basements. Waterproof, comfortable, warm underfoot, and available in convincing wood-look finishes. $3 to $7/sq ft installed.
- Porcelain tile: Indestructible and waterproof, ideal for bathrooms and laundry areas. Feels cold, consider in-floor heating in high-use areas.
- Engineered hardwood on a floating subfloor: Possible but carries moisture risk. Only recommended if you’ve addressed all moisture issues comprehensively.
- Avoid: Solid hardwood (will cup and buckle with moisture changes) and cheap carpet directly on concrete (mould risk).
Ceiling treatment:
- Painted drywall, cleanest, most finished look. Best for maximising height. Harder to access services above.
- Painted exposed joists, industrial-modern look. Paint joists, ductwork, and pipes all one colour (usually matte black or dark charcoal). Maximises height and provides easy access.
- Drop ceiling, easiest access to services above. Uses acoustic tiles. Loses 4+ inches of height. Looks institutional unless you use modern flat-panel tiles.
Permits and Code in Winnipeg
Finishing a basement in Winnipeg requires a building permit from the City of Winnipeg Planning, Property & Development Department. The permit process covers:
- Structural changes (new walls, openings)
- Electrical (new circuits, outlets, a separate electrical permit is needed)
- Plumbing (adding a bathroom requires a plumbing permit)
- HVAC (extending heating to new rooms)
Permit costs: Typically $150 to $500 depending on scope.
Inspections: You’ll need inspections at multiple stages, framing, insulation, rough-in (electrical and plumbing), and final. Build these into your timeline. Missing an inspection means opening up finished walls later.
Egress windows: Every basement bedroom must have an egress window, a window large enough to escape through in an emergency. Minimum opening: 380mm x 380mm (about 15” x 15”) with a minimum area of 0.35 square metres. If your existing basement windows don’t meet this, cutting larger openings in the foundation is required ($1,500 to $3,000 per window including the well). Research range, not a bid.
The City’s home improvement page is blunt: homeowners are responsible for getting permits before work starts, even when a contractor is hired. Their basement guidance is the same split as the kitchen: adding rooms, bedrooms, or livable space needs a building permit; cosmetic paint, flooring, and millwork do not. Electrical and plumbing still need their own trade permits. If a bid tells you finishing “doesn’t need a permit because we are only framing,” get that in writing and then call Permits Direct Line (204-986-5140) before you pay a deposit. How to vet the person holding the bid is how to find a home renovation contractor in Winnipeg.
Stay, sell, or a legal suite
Amazon and national basement galleries skip the calendar. Write the job down before you pick LVP.
Listing in the next season. Do not finish a $50,000 rec room for a 60-day listing. Buyers open the basement door after they like the living room. They need a dry smell, a lit stair, a swept slab, and an honest storage wall. That is Winnipeg home staging, not a legal suite. A musty finished room photographs worse than a clean unfinished one.
Staying five years or more. Spend on moisture, insulation, a bathroom near the stack, and a storage room you will still have after the furniture arrives. Keep the family-room finishes mid-range. The envelope-while-open rule from kitchen renovation ideas for Winnipeg applies below grade too: do not drywall a rim joist you have not detailed.
Legal suite. Only if zoning, parking, a second exit, fire separation, and a bedroom with egress are in the budget on day one. A wet bar and a sofa do not become a suite at listing time. The City will want a development permit for the use, then a building permit for the work.
One-storey stock. On a 1950s to 1970s bungalow the basement is the second floor you already own. The side door often drops a half-flight into it. That landing is a mudroom problem before it is a lounge.
I will not invent a rent or a resale lift for your neighbourhood. Walk two finished basements and one legal suite on similar streets, then decide which of the three jobs you are actually buying.
Winter start, spring close-up
Winter is a fair time to start a Winnipeg basement. Contractors are more available. You are not wrecking the yard. You can watch the sump during the heating season.
Winter is a bad time to close walls if you have not watched a thaw.
- Demo and moisture work in the heating season. You can see condensation, you can hear the sump, and you can run a long-term radon test while the house is closed up.
- Do not hang drywall in March on a wall that wetted in last April unless the exterior and the interior drain have been fixed and you have proof. Closing a wet assembly for a school-break deadline is how people buy mould.
- Window wells. Snow and ice in the well are a water source, not décor. Clear them. If you are cutting an egress opening, the well is part of the permit, not a spring afterthought.
- Inspections. Framing, insulation, rough-in, and final all need a visit. Missing one means opening finished walls. Build that into the 8 to 16 week band above.
Efficiency Manitoba still pays toward a pre-retrofit EnerGuide evaluation. If basement insulation is on the list, get approval before the foam goes up. The upgrade order lives on energy efficient home upgrades in Manitoba.
Radon before you call it a bedroom
Manitoba public health has long said the province tests higher than the national average. I will not invent a percentage for your street. The only way to know a house is a test.
Health Canada wants a long-term test, at least three months, with enough of that window in the heating season (typically October to April). Place the detector in the lowest level where someone will spend more than four hours a day. If you are about to turn the basement into a bedroom, an office, or a kids’ zone, that room is the test location, not a storage corner you never sit in. The Canadian guideline they compare against is 200 Bq/m³.
A C-NRPP-style long-term radon test kit is homeowner work. Mitigation is not. Listing check (radon kit): confirm it is a long-term detector (months, not a 48-hour charcoal snapshot), that a lab analysis is included or clearly sold, and that you are not opening a short-term screening pouch sold on the same “radon” page.
If the result is over the guideline, hire a certified mitigator before you hang a bedroom door. Sealing paint is not a radon plan. Closing a high reading behind new drywall is a regret you cannot stage away.
The Realistic Winnipeg Budget
These are research ranges from Winnipeg basement quotes we see: planning numbers, not a bid and not a lab test. Moisture work, a bathroom, or a legal suite moves you up the table. A single dry family room sits lower.
| Item | Budget Range |
|---|---|
| Moisture remediation (if needed) | $5,000 to $20,000 |
| Framing and insulation | $5,000 to $12,000 |
| Electrical | $3,000 to $8,000 |
| Plumbing (bathroom addition) | $4,000 to $10,000 |
| Drywall and paint | $4,000 to $8,000 |
| Flooring (LVP) | $2,000 to $5,000 |
| Bathroom fixtures and tile | $3,000 to $8,000 |
| Lighting | $1,000 to $3,000 |
| Trim, doors, and finishing | $2,000 to $5,000 |
| Permits and inspections | $500 to $1,500 |
| Contingency (15%) | $4,000 to $12,000 |
| Total (family room + bathroom) | $35,000 to $75,000 |
For a basic finish (one large room, no bathroom), budget $20,000 to $35,000. For a legal secondary suite, budget $50,000 to $90,000.
The Renovation Timeline
A typical Winnipeg basement renovation takes 8 to 16 weeks from demolition to move-in, depending on complexity and permit inspection schedules. Plan for:
- Weeks 1 to 2: Demolition, moisture work, rough framing
- Weeks 3 to 4: Electrical and plumbing rough-in, insulation
- Week 5: Inspections (plan for delays, Winnipeg inspection wait times vary)
- Weeks 6 to 8: Drywall, taping, sanding, priming
- Weeks 9 to 10: Flooring, trim, painting
- Weeks 11 to 12: Bathroom finishing, lighting, fixtures
- Week 13+: Punch list, final inspection, furnishing
Winter is actually a good time to start a basement renovation in Winnipeg, contractors are more available, and you’re not disrupting summer outdoor plans.
Common Mistakes That Waste Money
- Finishing before fixing moisture. The number one basement renovation failure. Mould behind walls, buckled flooring, musty smell. Fix water first, always.
- Overbuilding for resale. A $70,000 basement renovation doesn’t add $70,000 to a $350,000 home. Know your neighbourhood ceiling price.
- Forgetting storage. Before finishing, you had the entire basement for storage. After finishing, you need a dedicated storage room. Don’t eat 100% of the space with living area.
- Skipping the bathroom. A finished basement without a bathroom means everyone walks upstairs. Add at least a half-bath (toilet and sink). It transforms usability.
- Cheap lighting. Dark basements feel like basements. Invest in ample, warm, layered lighting. This is the number one factor in whether a basement feels like a real room.
- Ignoring sound. Sound travels through floors. If the basement will be used while people are sleeping above, insulate the ceiling cavities with mineral wool (roxul) for sound dampening.
Georgia Home Design note: We will not pick a sectional until someone has looked at the weeping tile, the window wells, and the interior insulation detail. The houses that waste the most money already have a sofa on a slab that still wets in April. If you can smell the basement after a thaw, you have a water problem. Furniture is later. Built examples of the “later” part, after the envelope is honest, are Project Lilac and basement transformation.
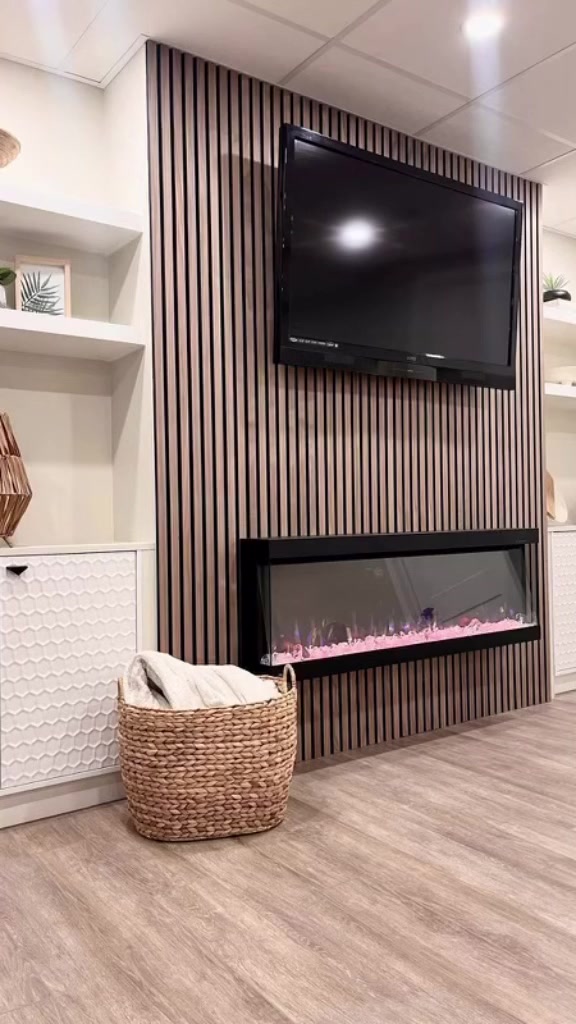
Project Lilac is the Winnipeg case study with real photos on this site. The Instagram before-and-after lists the actual scope: panelling out, a tiled bath and shower, windows, a new layout, insulation, an electric fireplace, carpet, and a wet bar with a backsplash. Wet-bar close-ups are on this post. A fuller after set is here. That is the sequence we mean by “furniture later”: envelope and layout first, then the bar and the lounge.
The same project also named the rest of the house on Instagram: a den that needed carpet, moulding, a custom mantle, paint, and an accent wall, and a stair remodel that replaced squeaky treads, extended the run, and patched original plaster. If you finish the slab and leave the hatch, you still have a basement.
Other tagged jobs had different lists. One client wanted a gym, heated-floor bath, laundry, barn door, and a kids’ movie zone. Another gym fit in a small footprint: mats, equipment, a chair, a fridge, a TV, a fan. Project Peony and Project Rose are other named rooms on the same set. Write your must-haves. Then read the moisture order above again.
When to skip DIY
Skip DIY. Hire licensed trades and pull permits when the work is:
- Active water or exterior waterproofing. Interior paint will not fix hydrostatic pressure on Winnipeg clay.
- Electrical. New circuits, a bedroom that needs egress lighting, or a panel that already looks full.
- Plumbing. A bathroom, a wet bar, or moving a stack. Rough-in is inspection work.
- Egress openings in the foundation. Cutting a bedroom window is not a weekend. Budget and code are above.
- A legal suite. Fire separation, a second exit, and a kitchen are not a rec-room refresh.
- Insulation against a foundation you have not proven dry. Fibreglass on damp concrete is a mould kit.
Cosmetic paint, LVP on a dry slab, and furniture layout after inspections pass are the honest DIY remainder.
When to Call a Designer
Basement design is less intuitive than above-grade rooms. The fixed constraints (posts, mechanicals, low ceilings, limited light) require creative problem-solving that can save thousands.
A design consultation makes sense if:
- You have challenging obstructions to work around
- You’re considering a secondary suite
- You want to maximise the usability of a compact space
- You’re spending more than $30,000 and want to get it right
At Georgia Home Design, I’ve worked on basement transformations across Winnipeg. A design consultation covers layout planning, material selection, and a clear scope of work you can take to contractors.
Planning a basement renovation? Georgia Home Design offers virtual consultations, I’ll help you plan a basement that’s dry, bright, and worth every dollar. Book a consultation →